
Day 36 - Unlocking Data Persistence: Mastering Persistent Volumes in Kubernetes! 🗃️💡


🚀 Day 36 of #90DaysOfDevOpsChallenge: Managing Persistent Volumes in Your Deployment! 💥 Excited to delve into the world of Persistent Volumes in Kubernetes and ensure seamless storage management. Let's keep the momentum going! 🙌🔥
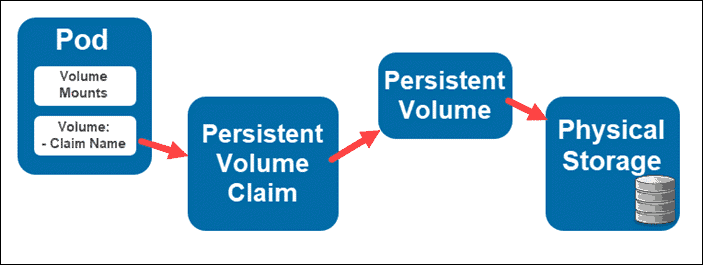
Table of Contents 📚
What are Persistent Volumes? 📦
What are Persistent Volume Claims? 📑
Task 1: Adding a Persistent Volume to your Deployment todo app. 🛠️
Task 2: Accessing data in the Persistent Volume. 💾
1. What are Persistent Volumes? 📦
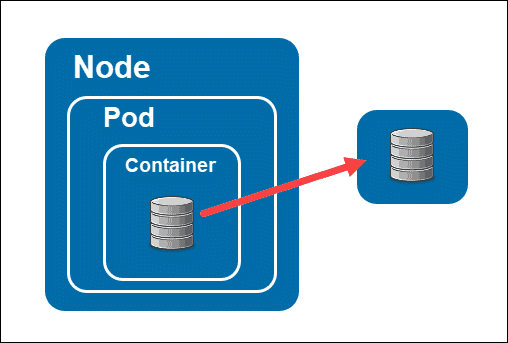
Persistent Volumes provide a way to manage and use storage in a flexible and durable manner, separate from the pods that consume it. They ensure data persists even when pods come and go.
PVs are like external hard drives attached to a computer, used for storing data that needs to persist even if the pod using it is deleted or recreated. They come in different types such as network-based storage, cloud storage, or local storage.
PVs abstract storage requirements from pods, simplifying management and enabling reuse across different pods.
2. What are Persistent Volume Claims? 📑
A Persistent Volume Claim (PVC) is like a request form for storage, used by pods to ask for specific storage requirements. Once approved, Kubernetes finds an appropriate Persistent Volume (PV) to fulfill that request, enabling the pod to use it as storage.
PVCs specify the amount and type of storage needed, and access modes, allowing pods to "claim" the storage they require.
Task 1: Add a Persistent Volume to your Deployment todo app. 🛠️
Step 1: Create a Persistent Volume
apiVersion: v1
kind: PersistentVolume
metadata:
  name: mysql-pv
  namespace: mysql
  labels:
    app: mysql
spec:
  storageClassName: manual
  capacity:
    storage: 2Gi
  accessModes:
    - ReadWriteOnce
  hostPath:
    path: "/home/ubuntu/mysql"
Apply using: kubectl apply -f persistent-volume.yaml -n mysql
Check using: kubectl get pv -n mysql

Step 2: Create a Persistent Volume Claim
apiVersion: v1
kind: PersistentVolumeClaim
metadata:
  name: mysql-pv-claim
  namespace: mysql
  labels:
    app: mysql
spec:
  storageClassName: manual
  accessModes:
    - ReadWriteOnce
  resources:
    requests:
      storage: 1Gi
Apply using: kubectl apply -f persistent-volume-claim.yaml -n mysql
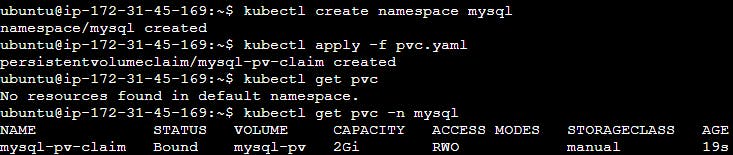
Check using: kubectl get pvc -n mysql
Step 3: Update deployment.yml
apiVersion: apps/v1
kind: Deployment
metadata:
  name: mysql-deployment
  namespace: mysql
spec:
  selector:
    matchLabels:
      app: mysql
  template:
    metadata:
      labels:
        app: mysql
    spec:
      containers:
      - image: mysql:8
        name: mysql
        ports:
        - containerPort: 3306
          name: mysql
        env:
          - name: MYSQL_DATABASE
            valueFrom:
              configMapKeyRef:
                name: mysql-configmap
                key: MYSQL_DATABASE

          - name: MYSQL_ROOT_PASSWORD
            valueFrom:
              secretKeyRef:
                name: mysql-secret
                key: MYSQL_PASSWORD
        volumeMounts:
          - name: mysql-persistent-storage
            mountPath: /var/lib/mysql
      volumes:
         - name: mysql-persistent-storage
           persistentVolumeClaim:
              claimName: mysql-pv-claim
Create the ConfigMap and Secret:
First, let's create the ConfigMap and Secret that your Deployment relies on. You need to create mysql-configmap and mysql-secret. Here are the commands:
bashCopy codekubectl create configmap mysql-configmap --from-literal=MYSQL_DATABASE=MYSQL_DATABASE -n mysql
kubectl create secret generic mysql-secret --from-literal=MYSQL_PASSWORD=MYSQL_PASSWORD -n mysql
Replace <database_name> with the actual name of your MySQL database and <password> with the desired root password.

Apply using: kubectl apply -f deployment.yml -n mysql


Task 2: Accessing data in the Persistent Volume 💾
Step 1: Connect to a Pod
kubectl exec -it <pod-name> -n <namespace> bash
Step 2: Verify Data Access
Inside the pod:
mysql -u root -p
Provide password and check databases using: show databases;

Create a table, insert values, and verify data presence.
Verify that you can access the data stored in the Persistent Volume from within the Pod.
Let's create a table with some values in the DB.
  #Show the list of database
  mysql> show databases;

  #Switch to the desired database
  mysql> use database-name;

  #Create table
  mysql> CREATE TABLE table_name (column1 datatype, column2 datatype,
  column3 datatype,....);

  #Insert values into table
  mysql> INSERT INTO table_name (column1, column2, column3, ...)
  VALUES (value1, value2, value3, ...);

  #Show all the values in the table
  mysql> select * from table_name;
That's it for today! Stay tuned for more updates. Happy Learning! 🎉📚