


Greetings DevOps enthusiasts! 🌟 Today, let's unravel the magic of Docker Volume and Network to enhance our container orchestration skills. 🐳✨
Docker Volume: Storage Sorcery! 📦
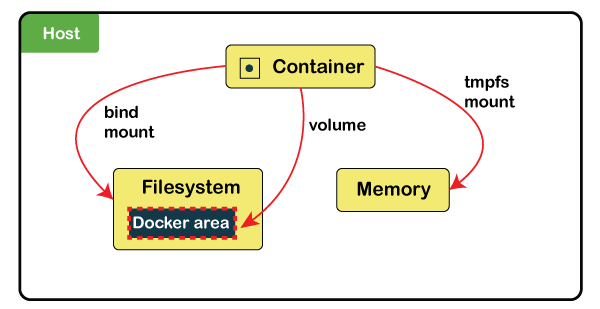
Docker volumes act as secret chambers outside containers, preserving precious data like databases even when containers bid adieu. It's like having a vault that multiple containers can access, ensuring data immortality. 💽
Docker Network: The Virtual Social Space! 🌐
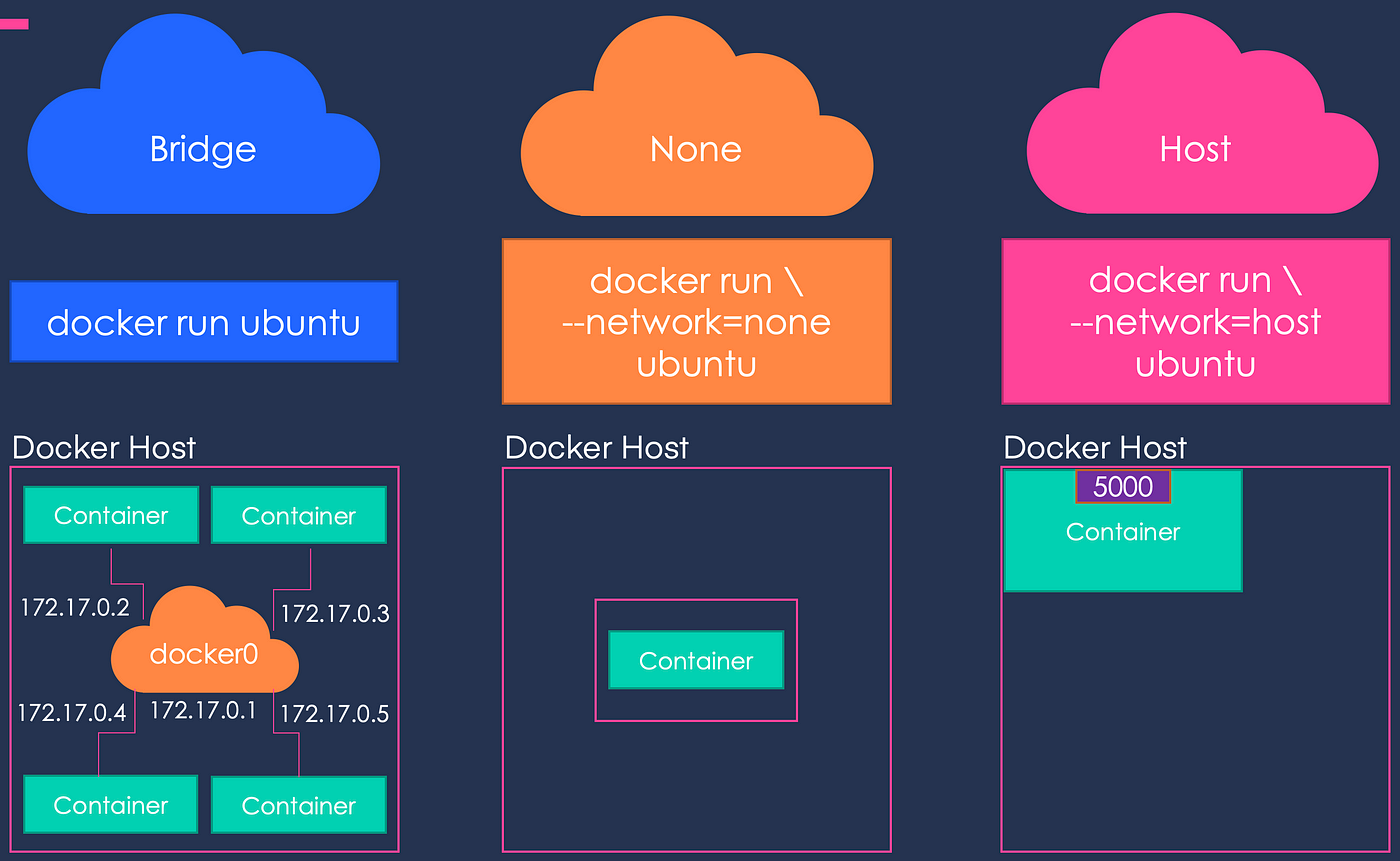
Enter Docker networks – virtual hangout spots where containers mingle and chitchat. They form a communication bridge between containers and the host machine. 🤝 When containers talk, magic happens! Reference
install docker-compose:
Linux:
Run the following commands:
sudo curl -L "https://github.com/docker/compose/releases/latest/download/docker-compose-$(uname -s)-$(uname -m)" -o /usr/local/bin/docker-composeThis command downloads the latest version of Docker Compose.
Apply executable permissions to the binary:
sudo chmod +x /usr/local/bin/docker-composeVerify the installation:
docker-compose --version

Task-1: Multi-Container Symphony! 🎭
Creating a multi-container setup using Docker Compose is a breeze! Here's a step-by-step guide:
Create a
docker-compose.ymlFile:version: "3.9" # specify the version of the compose file format services: # define the services or containers that make up your application web: # name of the first service image: nginx # name of the image to use for this service ports: # list of ports to expose on the host machine - "80:80" volumes: # list of volumes to mount on this service - ./web:/usr/share/nginx/html # mount the ./web directory on the host as /usr/share/nginx/html in the container depends_on: # list of services that this service depends on - api # depend on the api service api: # name of the second service build: ./api # path to the directory containing the Dockerfile for this service environment: # list of environment variables to pass to this service - MONGO_URL=mongodb://db:27017/test # specify the URL for connecting to MongoDB ports: # list of ports to expose on the host machine - "3000:3000" depends_on: # list of services that this service depends on - db # depend on the db service db: # name of the third service image: mongo # name of the image to use for this service volumes: # list of volumes to mount on this service - db_data:/data/db # mount a named volume called db_data as /data/db in the container volumes: # define any named volumes used by the services db_data: # name of the volume for persisting database dataReplace
your-application-imageandyour-database-imagewith the actual images you want to use.Run Containers in Detached Mode:
docker-compose up -d
This starts your multi-container application in the background.
Scale the Services (Optional):
docker-compose scale app=3
Adjust the number according to your needs. This showcases the power of scaling with Docker Compose!
View Container Status:
docker-compose ps
Check the status of all containers. Ensure everything is up and running.
View Service Logs:
docker-compose logs webReview logs specific to the 'web' service. Useful for debugging or monitoring.
Bring Down Containers:
docker-compose down
Stops and removes all containers, networks, and volumes associated with the application.
Task-2: Volume Ventures! 📂
Let's dive into the world of volumes:
Create Docker Volumes:
docker volume create my_shared_volume
This creates a named volume named
my_shared_volume.Run Containers with Shared Volume:
 docker run -d --name container1 --mount source=my_shared_volume,target=/app your-image
 docker run -d --name container2 --mount source=my_shared_volume,target=/app your-image
Ensure to replace
your-imagewith the actual image.Verify Data Consistency:
 docker exec container1 cat /app/data.txt
 docker exec container2 cat /app/data.txt
Check if the data is consistent across both containers.
List Volumes:
docker volume ls
Confirm the existence of the named volume.
Remove Volume (After You're Done):
docker volume rm my_shared_volume

Let's dive in, learn, and share the joy! 🌍✨